The Solution To Fogging: The Cyclone Mike from Action Fans

Share

The Solution To Fogging: The Cyclone Mike from Action Fans | AirsoftWarrior.net
(The Cyclone Mike was kindly given to me for review by its maker, Action Fans.  This in no way affects the content of this review.  I pride myself on providing honest, real world reviews that tell airsofters about products that make them more effective on the battlefield.)

Recently, I was in a battle with my team and I encountered one of the biggest issues in airsoft, FOGGING.  Within seconds of starting a round I couldn’t see much of anything.  There was no way I was going to be able to effectively fight in the battle.

After that game I decided I needed to find a solution.  During my research I found that most options were either too expensive, required permanent modification to your set up (which I don’t like to do), or weren’t effective enough for my needs (I sometimes wear prescription glasses during my airsofting, so I get double fog).

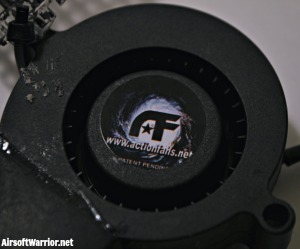
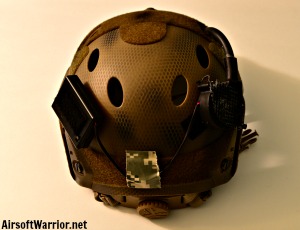
After looking around, I found the Cyclone Mike from Action Fans.  It had a unique design that interested me.  The fan features three main parts, the battery pack (It uses 4 AAA batteries.  The batteries are not included), a fan unit that sucks air in, and a sturdy air tube that allows you to direct air exactly where it’s needed to stop fogging.

The Cyclone Mike is inexpensive ($39.99+Shipping on ActionFans.net), requires no permanent modification (just use the included self adhesive Velcro strips or Velcro-like straps to connect it to your helmet or goggles), and is very effective in all environments that I tested it in.

Cyclone Mike Fan | AirsoftWarrior.net

Included in the package are:
– The Cyclone Mike Fan (fully assembled)
– One strip (approx. 3 inches) of both self adhesive hook and loop Velcro
– Two Velcro-like straps
– Two mini zip ties
– Instructions on using the fan as a cooling system instead of anti-fog.

In the video below, you can see my thoughts on the Cyclone Mike, as well as some footage of the Cyclone Mike doing its job in battle.


(If you’re an email subscriber, click HERE to watch the video on AirsoftWarrior.net)

The Cyclone Mike on a PJ FAST Helmet | AirsoftWarrior.net

I tested the Cyclone Mike in both training and battle.  I have used it temperatures from 40 degrees to 80 degrees and up.  I also tested it both indoors and out.  It preformed excellently in every environment.

The only fogging I ever got was near the nose bridge of my goggles (I use Lancer Tactical Deluxe Ventilation Goggles) or when my sweat was pouring down the goggles like water after I had the fan off for a while.

The Cyclone Mike is made out of plastic, rubber, and reinforced wiring.  I found that the fan actually can withstand quite a bit of punishment.  I accidentally had it fall off a table while on my helmet and it was just fine.  My battle buddy, The Chief, also has a Cyclone Mike.  While in battle, he scraped his Cyclone Mike up against a tree and it still operated like new.

The Cyclone Mike with Filter Kit Mesh | AirsoftWarrior.net

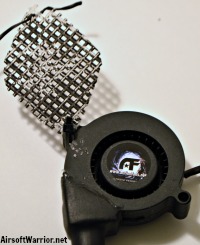
I decided to purchase the Filter Kit for the Cyclone Mike.  The Filter Kit includes a foam filter for really dusty environments, a plastic mesh cover to keep BBs and debris out of the fan, and two mini zip ties.

I found that the Filter Kit’s durability was not all it could be.  The plastic mesh split where the zip ties held it on to the fan unit.  I think a metal version (made out of the metal mesh used on airsoft masks) would be a big improvement on durability.

The Cyclone Mike is very quiet for the power it gives you.  I am still able to hear my teammates clearly and also hear the enemy moving around.  When in the woods, I sometimes turn the fan off and on as needed just to give me extra hearing ability while still staying defogged.

With the Cyclone Mike, I am able to go from completely fogged to defogged in a matter of seconds.  Needless to say I am very impressed with the features and function of the Cyclone Mike.  Thank you very much to Action Fans for sending the Cyclone Mike to me for review.   Be sure to check out ActionFans.net to buy your Cyclone Mike; and start being fog free today.


Share

Peak Performance: Cleaning Your Airsoft M4 Inner Barrel (KWA SR7)

Share


Peak Performance: Cleaning Your Airsoft M4 Inner Barrel (KWA SR7) | AirsoftWarrior.net

One of the most important parts of keeping your AEG at the peak of its performance is cleaning and maintaining the inner barrel.  The inner barrel is responsible for stabilizing the BB as it travels out of the AEG.

If the inner barrel is dirty or wet it can cause your accuracy to decrease.  If your shots are flying to the left or right, this is most likely due to the inner barrel being dirty.

In the below video, I’ll explain how to properly disassemble and clean the inner barrel on your M4 AEG (I don’t have an AK style AEG to demonstrate on at this time.  If I acquire one, I will try to do a video on it as well).

In the video I will:
– Give you a list of equipment you’ll need.
– Talk about the debate behind using oil to clean your inner barrel.
– Demonstrate disassembling the upper receiver and removing the hop up unit and inner barrel.
– Show you how to clean the inner barrel.
– Reassemble the gun.

Here is a list of the items you will need to clean your AEG’s inner barrel:
– Operator’s Manual
– Battery
– Cleaning and Unjamming Rod
– Gun Cleaning Patches
– Pen Light
– Permanent Marker
– Tools for removing the rear body pin (like a rubber mallet and Allen keys)

Please Note: I recommend removing all of your accessories (i.e. red dots, 1 point slings, etc.) so they don’t get in the way during the cleaning process.

I hope this video gives you the information you need to keep your inner barrel well maintained; and keep your AEG performing at its peak.  Enjoy!


(If you are an email subscriber, click HERE to watch the video on AirsoftWarrior.net)

Here are some links to check out if you want to know more about maintaining your AEG’s inner barrel:

How To Clean Your KWA Inner Barrel, Hop Up, and Bucking (from the KWA USA Forum)
Evike.com YouTube- The Training Center: Cleaning Your Airsoft Inner Barrel
KWA SR7 Operator’s Manuel (from the KWA USA website)

Share

KWA KM4 SR7 Internals

Share

KWA KM4 SR7 Internals | AirsoftWarrior.net

(This is the second post in a series on the SR7.  To see the first post click HERE.)

Arguably, the most important part of any airsoft gun is the internals.  The internals are what allows the airsoft gun to engage other players; and be reliable and effective on the battlefield.  Different gearbox designs (Version 2, Version 3, etc.) each have their strong and weak points when it comes to their internals.

The most vulnerable part of most gearboxes are the shell.  The shell encases all of the parts inside of the gearbox.  It also absorbs the impact causes by the pounding of the piston.  This can cause the shell to crack.  Other common airsoft internal issues include, pistons stripping, teeth on the gears breaking, and trigger contacts frying.

Most of the time, if you want to solve these issues yourself, or if you want improved the performance of your AEG you have to spend money on aftermarket parts and potentially hire a tech to install your new parts.  This can add up to quite a bit of money very quickly.

KWA Performance Industries wanted to solve the common internal issues (as well as less common ones); and give airsofters excellent performance right out of the box, by designing their internals to function as flawlessly as possible.  Their answer to internal and performance issues was the 2nd Generation Extreme Gearbox and the 2nd Generation Hop Up.

(Note: I personally have not opened up my KWA’s gearbox.  I can be a bit fumble fingered at times; and the internals don’t need to be upgraded anyway.  I got the internal parts information from several good sources.  You can find an older post from the KWA forum HERE, that lists the parts and compares them to the 1st generation KWA gearbox.  HERE is a list of all the parts you can purchase for the SR7 direct from the KWA website.  Also, check out this video from AirsoftGI to get more information on the 2GX gearbox.  I will be listing the internal parts and my thoughts on how they improve the KWA SR7 below.)

Let’s take a look at the 2nd Generation Extreme Gearbox:

Completely reinforced gearbox shell- KWA reinforced the gearbox shell, inside and out, to prevent gearbox cracking caused by the relentless pounding of the piston on the front of the shell.  They also reinforced the trigger post (This is the piece that sheared off inside my JG M4 CQB during the Tech Saga), by almost doubling the size and sloping the base for more surface contact.  You won’t have to worry about any issues there.  They also reinforced around the anti-reversal latch.

9 mm Ball Bearing Metal Bushings- These ball bearing bushings reduce friction inside the gearbox resulting in a higher rate of fire and a better gearbox reliability.  They are a nice, large, 9 mm size which gives them better strength.  Although you sacrifice some reliability that regular bushings offer, due to the lower FPS (therefor less tension on the bushings from the gears rotating) of the SR7, it’s not an issue.

Metal Air Nozzle (no O-ring)- The metal construction is a nice upgrade from your standard Ploy Carbonate nozzle.  An O-ring would be nice to provide an even better air seal; but the KWA already has one of the best compression systems on the market right out of the box.

Ported Metal Cylinder- It is ported to help give the SR7 it CQB FPS.

Poly Carbonate/Brass Cylinder Head (single O-ring)- A basic cylinder head.  An CNC aluminum head ($15+) with Sorbothane padding ($5) for corrected Angle Of Engagement (AOE) with the piston, would be a way to improve this component later.

Aluminum Piston Head (non ported/single O-ring)- Its aluminum construction will last a long time.  To my knowledge it is not ball bearing.

Poly Carbonate Piston- The last tooth is heat treated metal for extra strength.  The pick up tooth (the first tooth to make contact with the gears) is fully reinforced.  The second tooth is not removed.

M100 Spring- The M100 spring is just right for the SR7.  It gives CQB FPS and less wear on the internals due to less tension from the spring.  It also appears to have variable pitch for even smoother operation.

Ball Bearing Metal Spring Guide- The ball bearings makes the compression system run smoother because the spring is able to twist on itself, reducing tension.

Heat Treated Metal Gears-  The heat treating process strengthens the gears and reduces wear on them.  More strength equals less issues.

Metal Cut Off Lever- Your standard cut off lever.

Selector Plate- Standard.  Has an electrical cut off plate to give you enhanced safety.

Trigger Switch Assembly- Silver plated for better trigger response and less resistance from the wires.  Looks like it has a heat treated spring for extra strength.  I would recommend getting a Mosfet for longer contact life, especially if you are going to use a lipo.

Metal Trigger- Standard.  Trigger pull is stiffer than you find on some AEGs.  It is closer to the real deal.

Wire Set- Silver plated for better trigger response and less resistance.

Anti Reversal Latch- Heat treated for strength.

KWA KM4 SR7 Hop Up | AirsoftWarrior.net

Now for the 2nd Generation Hop Up:

The 2nd Generation Hop Up is a two piece unit, made out of a nice polymer.  It has the same texture as the crane stock’s polymer.  (I found it interesting that they continued the texture of the polymer to the inside of the gun.)

It is easy to adjust and my hop up setting stays in place during a game.

The best part of the 2G Hop Up is the hop up nub.  It has two points of contact (3 points when you count the bottom of the hop up bucking).  With the two points of contact from the nub you will encounter less “flyers” and better accuracy at longer ranges.  I have pitted the SR7 against field AEGs with longer barrels and higher FPS and have done just fine.  I can get the 2G Hop Up to put a 0.25g bb out to 120 feet (with the bb having an almost flat flight path till the last 10 feet) and hit a man sized target after adjusting for wind shift.  That is very good for a “CQB” AEG! 

I hope that this post has given you a solid over view of the KWA SR7’s internal make up.  The internals of the SR7 were the main reason I purchased one.  I was very impressed by the well designed and well constructed 2GX gearbox and 2G hop up.  If you are looking for a very well built gearbox and excellent internals (without needing any upgrades), be sure to check out the KWA SR7.


Share

Introducing The KWA KM4 SR7 “Devgru”

Share

Introducing The KWA KM4 SR7 Devgru | AirsoftWarrior.net
I recently purchased a KWA KM4 SR7 “Devgru”.  I wanted the reliability and battlefield prowess of a KWA.  So I purchased one from AirRattle.com.  It was the best deal I found because they include 3 Elite Force 140 round mid cap magazines and I was able to get 10% off!

In the below post and video, I’ll be introducing you to the SR7 and some of the features it has.  We will focus mainly on the externals in this post.  Upcoming posts and videos will include more information on the internals and function of the gun on the battlefield.

Here are some specs on the SR7 (per my testing and the manufacture’s specs):

Manufacturer: KWA Performance Industries
Length: 28″ Retracted/ 31″ Extended
Weight: approx. 6.3 lbs (I believe that this the unloaded weight.  It is a solid CQB gun.)
FPS (with 0.20g bbs): approx. 350 with no hop-up.  With my hop up adjusted for 0.25g bbs with a flat flight path and a range of 120 ft, it is about 330 FPS with 0.20g bbs (and 305 FPS with 0.25g bbs).
Gearbox: 2nd Generation Extreme (2GX)
Hop Up: 2nd Generation (2G) with two points of contact for better accuracy

In the box you get:
– KWA KM4 SR7 “Devgru”
– One K120 Mid Cap (120 round capacity)- Click HERE to compare to the price on Amazon.
– Barrel Cover (red color)
– KWA Manuel (in good English with great diagrams)
– KWA warranty sheet and the KWA lipo battery information sheet
– Two Allen wrenches (for removing the body pins)
– Front sight adjustment tool

Below is a video of the SR7 from the Airsoft Warrior YouTube Channel:
(If you are an email subscriber click here to watch the video on AirsoftWarrior.net)

In Depth Features of the SR7 (from tip to tail):
(All parts are matte black, except where noted)


KWA SR7 Free Float Rail | AirsoftWarrior.net

Forward of the receiver:
Flash Hider- Metal/bright orange- some of the paint has nicked off as I have battled.
Barrel- Metal/One piece
Front Sight- Triangle style/Front sling swivel attached- I wish the SR7 had a removable sight (like on the SR10) to make mounting and sighting in optics easier; but you could always install one later.  The sling swivel is a bit noisy as it hits the RIS.
Gas Tube- Metal/Silver color- supports the free float rail system
RIS- 7 inch/Free float/picatinny/15 slots per side- I have heard that you can transfer this RIS to a real AR if you wanted to. Each slot on the rail is labeled.
Delta Ring- Metal/Screw on- This delta ring is not like the one you find on an airsoft gun with a two piece RIS system. I like its unique look.

KWA SR7 Receiver | AirsoftWarrior.net

Receiver:
Upper and Lower Receiver- Metal/KWA Tradmarks/Unique serial number- The body feels very sturdy.
Magazine Release- Polymer/Concave- Good ergonomics.  Non Ambidextrous.  One thing I found strange, the mag can be pressed in after it has locked into the mag catch.  This creates a clicking sound when the mag is pressed up.  It may be part of the design, since the Chief’s SR7 does the same.  I have tested several different types of mags and get the same sound.  It doesn’t bother me, I just wish I could figure out why it does it and if it helps the gun’s function.
Bolt and Dust Cover- Polymer/Black Bolt/Gray Dust Cover
Forward Assist- Metal/Gray Button- The forward assist has no effect on the weapon; but does press in and spring back.
Bolt Catch- Polymer/Gray- The bolt catch is non functional.
Fire Selector- Polymer/Gray- It is very nice and crisp.  The fire selection labels are stamped into the lower receiver; but not painted in (which I like).  Non Ambidextrous.
Pistol Grip- Polymer/Textured- The vents on the bottom do not go all the way through to the motor compartment.  The motor height adjustment screw (gold colored) can be adjusted with a flat head screwdriver.
Top Rail- Metal/13 slots- with the removable, rear sight on you will have 10 slots open for optics.
Rear Sight- Metal/Removable/Adjustable for wind-age and elevation using knobs- Clicks are audible and can be felt.  It feels very sturdy.  It almost seems that they integrated a magnet into it to give an even better connection to the top rail.
Charging Handle- Metal- Not much to say about it.  It does stick sometimes when you pull it back.  This may be due to the reinforcement of the gearbox shell.

KWA SR7 Crane Stock | AirsoftWarrior.net

Behind the receiver:
One Point Sling Mount- Metal/One on each side
Buffer Tube- Metal- It does not have numbers to indicate the position of the stock.
Crane Stock- Polymer/Light Texturing/6 position/Hole on top to show numbers on buffer tube (but the buffer tube is not numbered)- Very nice and easy to adjust due to the spiral wiring inside.  Fuse is easy to check and change since it is integrated into the stock. The stock will fit a 9.6v 1600mAh Nunchuck Battery easily.
Stock Plate: Polymer/Textured/1.5 inches wide at back  – Very well designed.  The fins on the side prevent them from breaking as easily as some other stock plates do.  The stock plate is designed to fit a lipo battery inside of it.

I hope this overview helps you to better understand the SR7.  If you have any questions, comment them below.  Stay tuned for the upcoming posts and videos!


Share

KWA SR7- Coming Soon To AirsoftWarrior.net!

Share

KWA SR7- Coming Soon To AirsoftWarrior.net! | AirsoftWarrior.net

I recently purchased a KWA KM4 SR7 (also known as the KWA SR7, KWA SR7 “Devgru”, etc.).  For those warriors that haven’t heard of KWA Performance Industries or want to know more about them I recommend checking out their website.  You can find the link HERE.

KWA is known for producing quality airsoft weaponry that is used by police for training purposes.  Due to this reputation, you can imagine that KWA is also known for reliability and realism.  This means big things for any serious airsofter.

My goal is to give warriors the best and most comprehensive reviews on gear I can.  This requires me to thoroughly test all of the gear I review in airsoft combat until I am sure of whether it meets, or fails, Airsoft Warrior standards.  After I have had a chance to test the KWA KM4 SR7 out and have gotten plenty of battle action with it, I will be reviewing it here on AirsoftWarrior.net.

I plan on doing a 3-4 part series of posts/videos on the KWA SR7 to give you guys as much info on it as I can.  Stay tuned for the upcoming review.


Share

The Case For Mid-Caps

Share

The Case For Mid-Caps | AirsoftWarrior.net

There are three types of magazines available to the airsofter, High-Caps, Mid-Caps, and Low Caps.  High-Cap (High Capacity) magazines usually hold 300+ BBs depending on the gun type and require you to wind a mechanism (usually a wheel) to produce the tension that feeds the BBs into you airsoft gun.   Mid-Cap (Mid Capacity) magazines typically hold 90-180 rounds (again, this is based on the gun type).  They do not require winding because the BBs are propelled into the airsoft gun by a spring that runs throughout the magazine (For more on how Mid-Caps work check out this video).  Low-Caps (Low Capacity) magazines  are designed to hold a realistic amount of BBs (approx. 30 round based on gun type).   Their BB feeding system is like Mid-Cap magazines.  They require no winding.

You may be asking, “Other than those airsofters looking for ultra realism, who would want to use anything other than High-Caps?  They hold the most BBs, so I can carry the most rounds with me.  Wouldn’t carrying more rounds make me a better airsofter?  And, won’t I be reloading all of the time if I use Mid-Caps”  Today, I will answer those questions.

I want to talk primarily about Mid-Caps, because they are the middle ground in airsoft magazines.  Mid-Caps allow you to have more rounds than real weapons; but less rounds than a High-Cap.

To answer the first question Other than those airsofters looking for ultra realism, who would want to use anything other than High-Caps?”

  • Mid-Caps aren’t just for realism.  They have great qualities like easy feeding (no need to be constantly winding) and the ability to control how many BBs you carry.  With a mid cap you can load any amount of BBs up to the maximum the mag can carry.  This allows you to get the most out of your simulations.
  • Another benefit (for those who like realism) is that some Military Simulation (Mil-Sim) games will require Mid-Caps or Low-Caps.  If you want to get in on the Mil-Sim side of airsoft, Mid-Caps are the way to go.
  • As I mentioned before, Mid-Caps don’t require winding.  Nothing can be more frustrating than thinking your out of rounds in your High-Cap and finding out after the round that you just forgot to wind the mag.  Mid-Caps trade off the winding for a little more difficulty when loading (since they require a speed loader).

The second question is “Wouldn’t carrying more rounds make me a better airsofter?”.  Here is why this is not the case:

  • Airsoft is a sport that is designed to challenge and improve you.  Although High-Caps do hold the most rounds, they don’t present a challenge like Mid-Caps do.  With Mid-Caps you have to be a little more selective about how you use you BBs.  This improves you as a tactical warrior.
  • Mid-Caps also require you to refine your airsoft skills.  You have to practice reloading on the field and switching mags.  You can’t just double stack two mags, like you can with High-Caps, and get going.  You have to have good ammo and magazine management.  All of these skills are essential if you want to become a true airsoft warrior.
  • Mid-Caps also add to you stealth by not rattling in the field like High-Caps.

The final question is “won’t I be reloading all of the time if I use Mid-Caps”.  That is not the case if you have some good tactical airsoft skills.

  • My load out, when using Mid-Caps, consists of 6 magazines in three double-stacked magazine pouches.  Each one of my KWA K120 magazines carries 120 rounds.  With one magazine in the gun, this gives me 840 rounds!  In a recent battle involving 40+ players, in a field environment (lots of full-auto action), I only used about 4.5 of those mags during the 1.5 hour game (3 scenarios)!  I like to conserve ammo; but 840 rounds should be more than enough for any airsoft player who practices BB conservation.
  • Reloading a single Mid-Cap takes a maximum of about one minute.  It is easy to load all of you mags in between rounds or while in the field.  Get several Mid-Caps and it will take a while before you have to reload again.

I hope this post gave you some insight into the usefulness of the Mid-Cap magazine.  I personally enjoy using them.  They have added to my game play.  Let me know your thoughts on Mid-Caps and what you opinion on them is.  Thanks for reading AirsoftWarrior.net!


Share

New and Improved AirRattle Website

Share

New and Improved AirRattle Website | AirsoftWarrior.net

I just got on AirRattle.com to look at some airsoft weaponry.  I bought my first gun through them due to their great prices and thought I might find another great deal on the KWA SR7 that I’m looking at picking up.

Screenshot of KWA SR7 on AirRattle.com |AirsoftWarrior.net

After getting on today I instantly noticed the awesome new design.  It is clean and easy to navigate.  It also has a much fresher look than the older site, bringing it on par with many other top airsoft sites, like AirsoftGI and Evike.

Although there are a few minor things that could be improved (gun descriptions could be centered for easier viewing) depending on your personal preference.  The interface has also changed; and may take a little while to get use to if you used the old site.  It is still an excellent upgrade from their older site; and merits a look.

If you haven’t been on AirRattle.com for a while, or haven’t ever been on their site before, make sure to check it out.


Share

The Tech Saga: Part 3- Final Test of the Custom JG M4 RIS

Share

The Tech Saga: The Final Test of the Custom JG M4 RIS | AirsoftWarrior.net

In this final Tech Saga post on the JG M4 RIS we will put the upgraded and customized airsoft weapon through a series of test to determine its ability as a CQB weapon.  I hope everyone has enjoyed the Tech Saga series and has gotten a better understanding on what airsoft teching is.  If you have any questions on the Tech Saga feel free to comment them below.

The Tech Saga Series
The Tech Saga Part 1- Inside the JG M4 RIS
The Tech Saga Part 2- The Upgrade Parts of Champions
The Tech Saga Part 3- Final Test of the Custom JG M4 RIS

Share

The Tech Saga: Part 2- The Upgrade Parts of Champions

Share

The Tech Saga- The Upgrade Parts of Champions | AirsoftWarrior.net

In the last Tech Saga Post we took a look at the internals of my JG M4 RIS and explained some of the parts you will want to upgrade in a stock airsoft AEG.  In the below video you can see all of the parts I used in my JG M4 RIS, the end result of the install, as well as some of my thoughts on the parts I used and the benefits of them.  Enjoy!

Here is the list of the parts I used in my upgrade along with links to the websites I bought them from.  I have also included some thoughts I had on each part.-

Matrix V2 CNC Steel Ball Bearing Spring Guide by SHS
A ball bearing spring guide reduces wear and tear on your gearbox by allowing the spring to twist on itself instead of storing unnecessary energy. This spring guide has worked great with my ICS ball bearing piston head and also had enough threading for my buffer tube screw.

Hawk Arms Aluminum Air Nozzle
An aluminum air nozzle will last longer than a a stock plastic one.  The single o-ring in the Hawk Arms Air Nozzle aids in air compression and works much better than the stock version.

G&G M100 Spring
G&G makes quality produces and this spring is excellent as well.  The M100 level spring produces 320-350 fps depending on the quality of the other parts in your airsoft gun. The coils of this spring have a variable pitch which helps to reduce stress on other components of the gearbox.

Angel Custom G2 SUS 304 Stainless Steel Tightbore Barrel (363 mm X 6.01 mm)
A tightbore barrel will increase both accuracy and air compression by decreasing the amount of space around the BB as it travels down the barrel.  The Angel custom barrel is an excellent addition to any airsoft custom build due to the ease of installation and the cost to benefit ratio.

ICS Reinforce Polycarb Piston w/ 8 steel teeth + Ball Bearing Piston Head
(
Note:  I only used the piston head in my upgrade due to a mistake I made in installing the piston itself.  I put the piston in the shell and failed to check that it was on the rails properly.  The piston stood up to my repeated attempts to cycle the gun but ended up being warped beyond repair.  I did use the ball bearing piston head on my stock piston with no issues and excellent air seal.)

Matrix 8mm CNC Precision Steel Ball Bearing Bushings
I had some difficulty installing these bushings into my new gearbox shell.  I would recommend buying a bushing install tool  to aid the process.  I increased the number of revolutions from 5, with out the ball bearing, to 20+ with them.  The increased revolutions will reduce wear on the gears and may increase ROF.

Modify Torus 8mm Reinforced V2 Gearbox Shell w/ Tappet Plate
This shell installed easily into my JG M4 RIS’s ABS plastic body and fit all of my stock components.  The inspection ports were great for checking over the gearbox and making sure my spring was not cocked when I wanted to store my gun.

Scatterplot Sorbo Pad 1/4″ 40D
A sorbothane pad is the best way to correct Angle Of Engagement (AOE) to help lessen pressure on the piston from the upward motion of the gears when they cycle.  It also helps to reduce the stress on the front of the gearbox.

Modify Metal Precision Shim Set
Shiming your gears allows for less friction inside the gearbox and faster ROF. These shims were excellent.  Each thickness was a different diameter to make picking the right thickness easy and simple.  I highly recommend them.

Lonex A5 Durable Standard Motor (Long Type)
The Lonex A5 is one of Lonex’s lower end balanced motors.  A balanced motor has a mix of torque and speed.  This motor is ready for up to a M120 spring. One of the side effects of using this motor with an M100 spring is that it has a tendency to half cock the piston.  In theory this decrease trigger response time because the piston is already half way back.  Be sure to check out your gearbox after a day of battle and mess with the trigger to reset the spring. The rate of fire is also lower than I expected.  I may end up purchasing the A4 (high speed) version to increase the ROF.

Aim Top High Concentration Silicone Oil
I use this liquid silicone oil on my piston head o-ring to help with lubrication and air seal. The liquid form has the right viscosity for this purpose.

Evike.com Competition Grade Silicone Spray
I used the spray form of the silicone oil to clean my barrel.  If you use the liquid form you will have to be extra sure that the barrel is dry for maximum accuracy.

Gaurder Phantom Teflon Grease
Teflon grease is said to work better than other greases in cold environments.  So it appears I am good to go for any Arctic airsoft wars.  It has a white color that looks a little less messy than the black colored greases when you are applying it.  I used it on my gears and on the piston rails.


The Tech Saga Series
The Tech Saga Part 1- Inside the JG M4 RIS
The Tech Saga Part 2- The Upgrade Parts of Champions
The Tech Saga Part 3- Final Test of the Custom JG M4 RIS


Share

The Tech Saga: Part 1- Inside the JG M4 RIS

Share

The Tech Saga | AirsoftWarrior.net

Recently I started getting into the technical side of airsoft.  I wanted to learn about the ins and outs of my AEG in an attempt to gain more knowledge about the awesome sport of airsoft.  This post is the first of the Tech Saga series.  In the Tech Saga I will show you the basics of teching your airsoft AEG, the problems I encountered during my tech work and how you can avoid them, and the end result of my tech job on my JG M4 RIS.

First we will get some lingo out of the way.  The gearbox (or mechbox) is the heart of your airsoft gun.  It provides the air compression that propels the BB down the barrel.  A good video on the inner workings of an AEG can be found here.  There are many types of gearboxes (Version 1, 2, 3, 4, etc.) but they all work essentially the same.  The removal and part design are often different from version to version so be sure to research the parts you are getting to ensure compatibility. The version you have in your airsoft gun varies.  M4/M16 style airsofts often have Version 2 (V2) gearboxes.  An AK or G36 mainly have Version 3 (V3) gearboxes.  I have a Version 2 gearbox in my JG M4 RIS.

The obvious goal of teching (or airsmithing) your AEG is to repair, upgrade, and/or maintain your airsoft gun.  But always remember the real goal is to learn and enjoy your experience.  If you get tired or frustrated, put the pieces in a safe place (I have a special work table set up), take a break, and relax.  Believe me, it is better to wait until you feel up to the task then to press on.

I decided to tech my JG M4 RIS to repair the gearbox shell after the trigger post broke.  This is common problem with Version 2 (V2) gearboxes with weak shells due to the stress put on that post by the trigger trolley (watch the video to learn more).  I also wanted to upgrade the internals for CQB operations (350 fps or less) and increase the life of the weapon overall.  In this post is a video of my JG M4 RIS’s internals and what parts you will want to upgrade, or look for, in you airsoft gun.

Stay tuned for more installments of the Tech Saga.  We will be examining the parts that I used to build this Warrior Grade weapon, the end results, of this custom build, and more! Coming soon to AirsoftWarrior.net!

The Tech Saga Series
The Tech Saga Part 1- Inside the JG M4 RIS
The Tech Saga Part 2- The Upgrade Parts of Champions
The Tech Saga Part 3- Final Test of the Custom JG M4 RIS

Share